QuickBooks Database Manager (QuickBooksDBXX) Service Conflicts with DNS Server Service
A problem can occur when QuickBooks Database Manager (QBDM) is installed on a Windows Server that is also acting as a DNS server. In brief, the issue occurs because the QuickBooks Database Manager attempts to use a port that’s already in use by the DNS server service. When the QBDM service starts it encounters a conflict with the DNS server service and immediately terminates.
Intuit provides a list of possible fixes to the problem, but none of them address the issue of DNS server service conflict.
To solve the port conflict problem a system administrator must exclude a port (or a range of ports for previous versions of Quickbooks). This example shows how to resolve this problem when using QuickBooks Desktop 2020, however the principles shown here can be applied to previous versions of QuickBooks as well.
Pre-Test:
Before proceeding to the “Permanent Fix” take a moment to test this quick solution to see if it resolves your problem. To pre-test this solution simply:
- Stop the DNS server service
- Attempt to start the QuickBooksDB30 service
- If the QuickbooksDB30 service starts without throwing an error then you will have confirmed that a conflict exists between the DNS server service and the QuickBooks Database Manager service. Continuing to the “Permanent Fix” section below after you:
- Stop the QuickBooksDB30 service
- Start the DNS Server service
- If QuickBooksDB30 service starts and then immediately stops then additional troubleshooting is required. Start the DNS server service and then consider contacting Help-O-Matic for additional assistance.
Important Note: The steps taken in the Pre-Test will be undone on the next server reboot, so it’s important to continue on to the “Permanent Fix” to assure the issue doesn’t recur.

Permanent Fix QuickBooks Desktop Database Manager 2020:
After determining that there is a conflict between the DNS server service and the QuickBooksDB30 service, take the following steps to solve the problem permanently*:
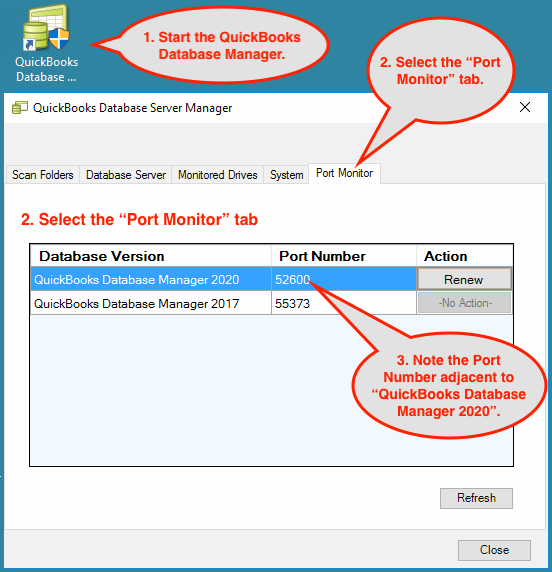
- Open the QuickBooks Database Manager program
- Select the Port Monitor tab
- Note the Port Number adjacent to the QuickBooks Database Manager 2020 Version. Swap the noted port number with the xxxxx in the command below.
- Stop the DNS Server service and the QuickBooks service
- Reserve the noted port by entering the following at a command prompt:
netsh int ipv4 add excludedportrange protocol=udp startport=xxxxx numberofports=1
- Start both services
The problem can be considered solved if both services start without error.
Solutions for Other Versions of QuickBooks:
QuickBooks 2019
Use the same steps as with the solution for QuickBooks 2020, only use the port associated with the QuickBooks Database Manager 2019 as appears under the Port Monitor tab.
Quickbooks 2018
- Stop the DNS Server service and the QuickBooks service
- Reserve the noted port by entering the following at a command prompt:
netsh int ipv4 add excludedportrange protocol=udp startport=55378 numberofports=5
- Start both services
Quickbooks 2017
- Stop the DNS Server service and the QuickBooks service
- Reserve the noted port by entering the following at a command prompt:
netsh int ipv4 add excludedportrange protocol=udp startport=55373 numberofports=5
- Start both services
* It should be noted that starting with QuickBooks 2019 Intuit changed it scheme for port requirements. Prior to QB2019 the QuickBooksDBxx service used fixed set of port numbers (e.g. QuickBooks Desktop 2018 uses fixed ports 8019, 56728, 55378-55382). Starting with QB2019 Intuit chose to use “dynamic” ports instead. The steps above will work as long as the dynamically assigned port doesn’t change. Because this port is now identified by Intuit as “Dynamic” it’s possible that it may randomly assign a different port number. A port change will cause this problem to recur and an administrator will have to repeat the steps above to resolve the problem again.
